Table of Contents
Analog Battery Meters
Examples
Via Rotation:
 Rotation:  3.6*{bl}  (0% @ 0ᵒ to 100% @ 360ᵒ – diminishing Counterclockwise)
 Rotation:  (1.8*{bl})+180  (100% @ 0ᵒ to 0% @ 180ᵒ – diminishing Counterclockwise)
 Rotation:  1.8*(100-{bl})  (100% @ 0ᵒ to 0% @ 180ᵒ – diminishing Clockwise)
Via Circle Shaders
(Segment Between – Opacity in range 100%, Opacity Out of range 0%)
 Start:  180+(9*(math.floor(({bl}/5)+0.5)))  (100% @ 0ᵒ to 0% @ 180ᵒ – diminishing Counterclockwise)
 End:  360
 Start:  0
 End:  180-(9*(math.floor(({bl}/5)+0.5)))  (100% @ 0ᵒ to 0% @ 180ᵒ – diminishing Clockwise)
Intro to Battery Meters
Battery Meters are one of the most requested “Math” functions among users of WatchMaker. They’re fairly straightforward, but what makes them tricky is that there are so many variations. When making a battery meter, you need to ask yourself the following:
- Where (in degrees) is 0%?
- Where (in degrees) is 100%?
- In which direction will the meter diminish (move from 100% to 0%)?
- Will the meter be smooth or segmented?
If you have a meter dial already set up, the easiest way to find the 0% and 100% points is to create any watch hand, and change its rotation value using the left/right arrows, until it is a positive number, pointing directly at the desired mark on the dial. The Rotation Value shown will be the value for item 1 or 2 as appropriate.
The Diminish direction is important. Perhaps you want to make a circular meter, with the watch battery on one side, and the phone battery on the other. One will likely be a mirror image of the other, meaning that one will diminish Clockwise, and the other Counterclockwise.
Segmented meters are used when you want an “LED” effect, where you light up equal segments such that an entire segment lights at once. This is very common for battery meters and makes a cool effect. In almost every other case, you’ll use smooth meter calculations for battery meters.
Explanation of Examples
Rotation
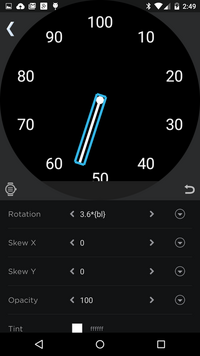 So let’s explain those examples. The first set uses rotation. This assumes that you’re using a watch hand as a battery meter. However, you can use circle shaders too, with the exact same formulas. The only difference is that instead of using the Rotation field, you’ll use the Circle Shader’s Start and End fields. ONE of those fields will have the formula, and the other will have the start or end point as appropriate (similar to the segmented examples, which we’ll cover in a bit).
The first example is a simple meter, working as a clock hand. 100% at 12:00, moving counterclockwise, and ending up back at 12:00. There are 100 possible values for battery percentage, and we need to move 360ᵒ. 360/100 is 3.6, so we multiply battery level by 3.6.
3.6*{bl}
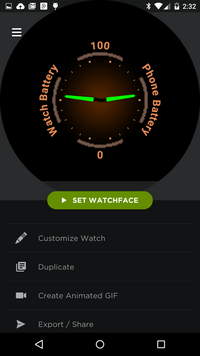
The next couple examples assume more of a “watch battery on one side, phone battery on the other” approach. Still, 100% is at 12:00. We simply move 0% to the bottom. Now each meter is half the circle. The examples both show the watch battery {bl}, so you’d simply change the one you want as the phone meter to {pbl}.
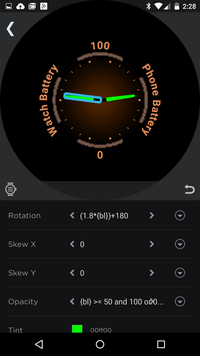 The first example of the set is the left side. We’re basically just cutting the first example in half, so the rotation is the same, but we need to start at 180ᵒ, instead of 0ᵒ, and the meter only has to move half as far. So, we reduce the multiplier down to 1.8, and we add the start point at the end. Thus, 3.6*{bl} becomes…
(1.8*{bl})+180
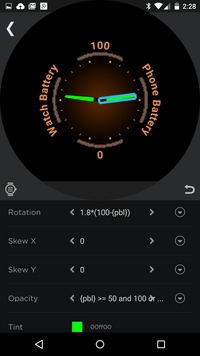 The second of the set needs to rotate in the other direction, so we take the INVERSE of battery percentage. In other words, instead of measuring how far from empty (92%), we ask how far from full (8%). We do that by subtracting battery level from 100. Then, it’s identical to the first example, except we again only travel half as far, so we use half the multiplier.
1.8*(100-{bl})
Circle Shaders (Segments)
This is where things tend to get tricky. You want to simulate LED sections lighting up, but you want to ensure that the ENTIRE segment lights up (or extinguishes) at once, or you ruin the effect. Luckily, it may sound like a challenge, but it’s really pretty simple.
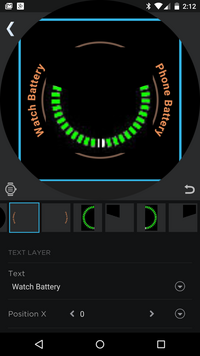 Here, rotation won’t work, because a smoothly rotating circle would slowly cut into a segment, and we want to light it up (or extinguish it) all at once, so you’ll need to add a circle object, go into its shader section, and create a “Segment Between” shader. There are two types of shaders. One that hides, and one that reveals. Which one you use is up to you, and probably depends on the graphic you’re using to simulate the LED effect, and the color of the shader. To turn a REVEAL shader into a HIDE shader (or vice versa), all you need to do is swap the Opacity In Range and Opacity Out of Range values. Or, you can swap the Start and End values, whichever works for you. Keep in mind though that shaders always move clockwise. The end value should be higher than the start value.
For these examples, we’re going to duplicate the “watch on one side/battery on the other” approach, where 100% is at 12:00 and 0% is at 6:00. We’re also going to assume that EACH side has 20 equal segments (LEDs) to be lit. Red HIDE shaders will be shown in the pictures to illustrate what we're doing, but normally, they'd be the same color as your background (HIDE Shader), or the desired color (REVEAL Shader).
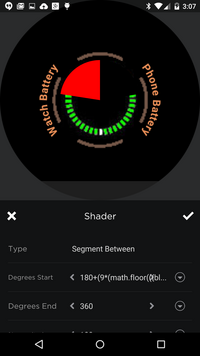 On the left side, the formula is 180+(9*(math.floor(({bl}/5)+0.5))). The 180 is, again, the starting point. We have 180ᵒ to travel, with 20 equal segments. 180/20=9, so we get 9 degrees per segment. Also, we have 100 units to measure in those 20 segments. 100/20=5, so we end up with 5% of battery per segment. Math.floor means to drop any remainder in the division problem, so that we don’t have to deal with the other 1-4% of battery levels, and we ROUND to the nearest 5% by adding 0.5 to the number before we drop that remainder. So, the formula is really: start point + (degrees per segment * (math.floor(({bl} / percent per segment)+0.5))). Fill everything in, and it becomes…
180+(9*(math.floor(({bl}/5)+0.5)))
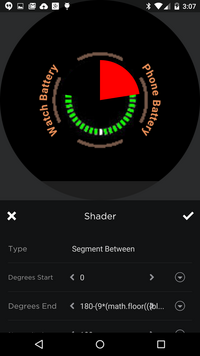 For the right side we’re moving the other way, so we end at 180ᵒ and subtract the rest, where we’d added before. Otherwise, it’s the same formula. Notice though, that earlier, we used the START field of the shader, but here, the END field will be used.
180-(9*(math.floor(({bl}/5)+0.5)))

